Running a Payroll
Once you have entered all of the Maintenance information into the Payroll program, you can then run a Payroll. To begin running a pay for either Employees or Independent Contractors, click the Payroll button and choose Calculate Payroll.
Step 1 - Running a Payroll (select pay date)
- Click on the Payroll button and choose Calculate Payroll.
- Enter the Pay Date (or Settlement Date for EFT transactions) and the Pay Period Ended date. The default for each of these is today's date. The Pay Date or Settlement Date is the date that will be used as the "Date Occurred" for the Payroll transactions in Accounting and is the most important since that’s when the transactions will be recorded as well as posted to payroll database for tax purposes. The pay period ending is more for informational purposes.
- Click on Next.
Step 2 - Running a Payroll (select employees to pay)
This screen allows you to select employees/contractors to pay:
Numbers below refer to the labels pasted on the screen above.
- Choose Employee Type: either employees or independent contractors.
- Choose All or Specific Employees/Independent Contractors. If you select All, then all of the following options are available. If you select Specific, you see a list of all the employees or contractors. Click on the Clear All button, and select the individuals to pay.
- The pay calculation can be limited to pay type (hourly or salaried).
- The pay calculation can be limited to individuals paid in certain frequencies (weekly, bi-weekly, monthly, semi-monthly or daily/miscellaneous).
- The pay calculation can be limited to certain departments.
Click on Next.
Note:
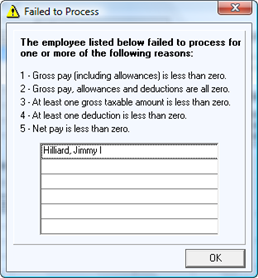
If you have already processed a payroll for an employee(s) for the pay date or pay period ended date, you will receive a warning "Employee(s) [Contractors] have pay previously posted with the Same Pay Date or Pay Period Ended Date." The employee(s) will have a red x beside their name(s). If the employee is to receive an additional pay for this date Click on OK. Click on Cancel, to return to the employee selection screen. NOTE: you can NOT pay people additional pay for the same pay date if the employees are using Direct Deposit. This is not allowed at banks, and those with a red X will NOT be processed.
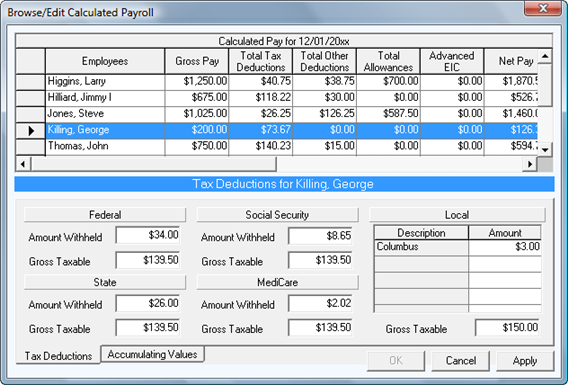
Step 3 - Running a Payroll (confirming payroll information) |
|
|
|
The following screen will appear. |

You may edit hours, pay rates, deductions, and allowances for the current pay. Editing this area will only change the current pay. It will not make permanent changes to the employee file. You can also remove employees from the current payroll run without deleting their employee record.
If you want to make a change for the current pay:
- Click on the name of the employee.
- Select the tab where the changes are to be made.
- Click on the box you want to change.
- Delete the current dollars or hours and enter the new information.
- After completing all changes, click on Next.
The program will also allow you to create a new deduction or allowance from this screen. On the Deductions or Allowances/Other Pay tab, click on New and the Add Deduction or Add Allowance screen will appear. After completing the requested information, click on OK to close the screen. Now, you can click the down arrow in the ID column to add the deduction or allowance to the employee's pay.
If you click on the Cancel or Back button, you will lose any temporary changes entered in this step.
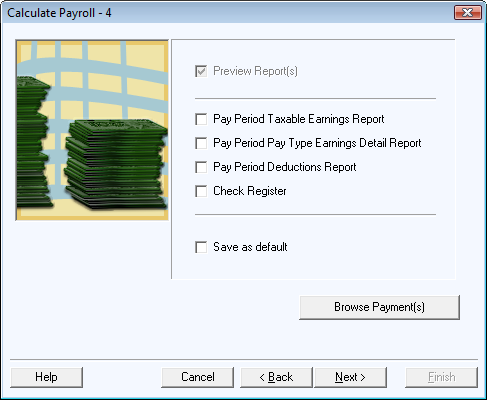
Step 5 - Previewing and Printing Payroll Reports (during pay calculation)
All reports generated during the pay calculation process can be accessed from the Reports menu. Put a check mark in the Preview Reports box on Step 4 of the payroll calculation and in the box beside each report you wish to preview. To preview the same reports the next time payroll is calculated, put a check mark in the Save as default box. Click on Next.
- To change the appearance of these reports by click on Page Setup or Fonts. Click on the Print button to print one or more of these reports. Click on Next.
Step 6 - Posting Payroll to the Employee's Record
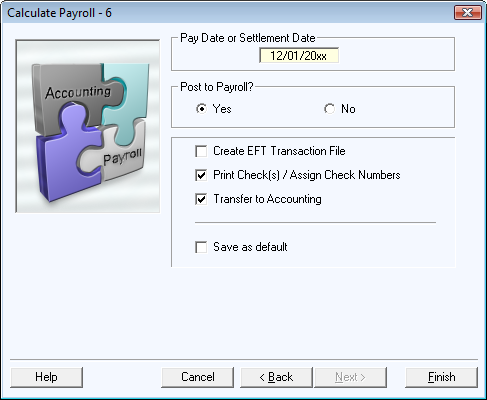
To post the payroll calculated, select Yes and the program will proceed to Print Check(s) screen. Put a check mark in the Create EFT Transaction File box if one or more employees will be paid by Direct Deposit.
If you select No, and Finish, you will get a message "Payroll has successfully been CALCULATED but not posted for [date]."
If you hand-write pay checks you will be able to assign check numbers on the Check Printing screen. Employers may print the paychecks on blank paper and distribute them as pay notifications or pay stubs.
Check numbers must be assigned through the Check Printing routine before the payroll transactions can be posted to the Accounting module.
Printing checks
The next screen will look like the following picture.

Enter the starting check number and press the tab key on the keyboard. The check numbers will fill consecutively.
- If the checks will be issued on a different date, change the date field.
- Show Memo Field – If you check this box you may enter text in the box which will be printed in the memo space of the checks printed. The same memo will be printed on every check in the entire list.
- This screen lists all payroll checks that are in the queue waiting to be printed. If you have unprinted checks from a previous payroll, they will also be in the check printing queue. You may edit any of the check numbers if necessary.
- Put a check mark in the Preview box, then click on Next. Click on the up or down arrows to move through the pages on the print preview screen.
- Click on Print. DO NOT go any farther until you are sure all checks have printed correctly.
- "Did all checks print correctly?" will appear on the next Check Printing screen. If all of the highlighted checks need to be reprinted, click on No. If one or more checks did not print correctly, click on that line to remove the highlighting for that specific check and click on Yes. Checks not highlighted will remain in the printing queue. Click on Finish.
To go back to the checks that need reprinted, click on Reports and Print Checks. Any checks that were not highlighted will still be in the printing queue.
If you do not need to print the checks, for example, you issued a manual check, you can put a check mark in the "Check Printed?" column on the left. You must have a check number in the check # column to be able to put a check mark in the check printed column. After answering yes to "Did all checks print correctly?" and Finish, the check will be removed from the printing queue.
Note: You will get a warning message "Posted payroll entries exist that have not been assigned check numbers" when you open the payroll program until all checks have check numbers assigned.
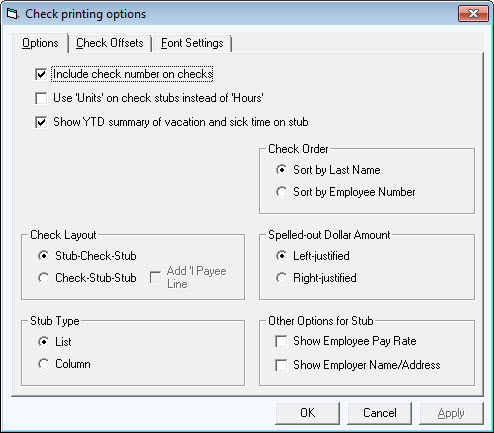
Check Printing – Options
Click the Options button to view or change items that affect the appearance of the check and/or stub. Select the options that best fit your needs.
- If you choose the Check-Stub-Stub option, the "Add'l Payee" line will become available. This will print the Payee name again up above the original name and address in the middle.
- There are also tabs for Check Offsets to move the type in any direction on the check, as well as fonts to customize the appearance.
- NOTE: some states now require that the employer phone number also be shown on the stubs. If you select the Show Employer Name/Address box on the Options tab at the bottom, the phone number will also show on the stub.
Transfer to Accounting
- If you checked the Transfer to Accounting box, the transfer screen will come up after the checks have been printed.
- You can scroll through the screen to verify that all Accounting account numbers have been entered. Then click on Transfer.
- After posting, you will get a message that the pay was posted successfully.
- You can print a copy of the Accounting Transfer Audit Report to maintain in your files.

You have now completed the payroll process.
Preparing Payrolls in Advance
The Payroll program permits you to process payroll calculations in advance. For instance, someone is taking an extended leave of absence and wants to generate the payroll checks for the period they will be gone without transferring the payroll amounts to Accounting.
- You may perform Steps 1 through 5 of Running a Payroll as normal. In Step 5 you may print any of the reports.
- When you are ready to transfer the processed payroll(s) to Accounting, go to Payroll, and the Transfer to Accounting button will be available.
